在 IIS 7.0 的時候,由於需要額外安裝 Windows PowerShell Snap-In for IIS 7.0 才能在 PowerShell 裡管理 IIS 7 的相關站台與設定,而且安裝好之後還會在「程式集」中建立一個 IIS PowerShell Management Console 的捷徑,開啟之後就可以立即開始使用這些好用的 Cmdlet。不過此功能到了 IIS 7.5 已經內建在作業系統裡,感覺好像是件好事,不過它卻把 Snap-In 的捷徑移除了,我在不熟悉 Windows PowerShell 的時候還真的找不到開啟的方法,費了些功夫才研究出來。
在 Windows Vista / Windows Server 2008 時,在安裝過 Windows PowerShell Snap-In for IIS 7.0 之後,在桌面就會出現一個如下圖的捷徑,非常方便:

到了 Windows 7 / Windows Server 2008 R2 之後,沒辦法讓你安裝 Windows PowerShell Snap-In for IIS 7.0 (因為已經內建),如果想安裝 Windows PowerShell Snap-In for IIS 7.0 還會告訴你不能安裝,殘念~
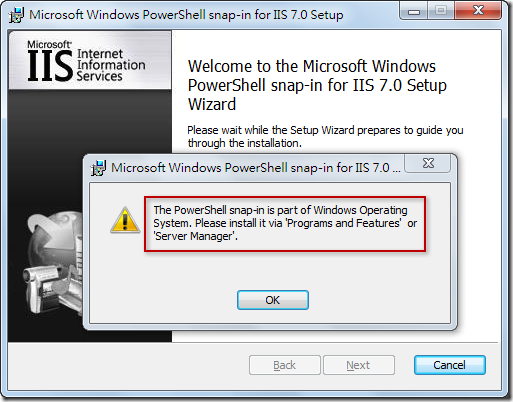
其實真相是,IIS 7.5 已經不把這東西當成是 Snap-in 了,而是改用 WebAdministration 模組來替代,原因不明。所以在開啟 Windows PowerShell 視窗後要能使用這些方便的 Cmdlet 會需要手動匯入 WebAdministration 模組才行,這個匯入的動作沒人跟你講,你可能會找半天還找不到,我第一次使用時就花了不少時間才研究出來,但其實我要的是一個方便開啟的捷徑而已!
若要手動載入 WebAdministration 模組,你知道最難的的地方在哪裡嗎?答案就是:你必須知道模組名稱是 WebAdministration!上網查 IIS.net 的文件,所有關鍵字都是 Windows PowerShell Snap-In (當時我也不知道原來 IIS 7.5 已經換成用 Module 的方式載入),從官網也看不出原來要載入的是 WebAdministration 模組,所以就會開始卡關卡一段時間,直到找到相關資料為止。@_@''
所以我先介紹一個重要的指令,可以列出在你電腦裡可用的模組有哪些:
Get-Module -ListAvailable

備註:WebAdministration 模組的所在位置如下:
%SystemRoot%\system32\WindowsPowerShell\v1.0\Modules\WebAdministration
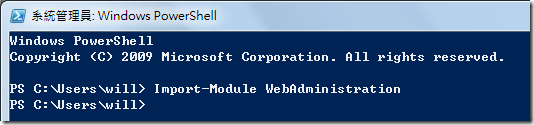
所以,當你開啟 Windows PowerShell 之後,必須手動先匯入 WebAdministration 模組,指令如下:
Import-Module WebAdministration
如果你想知道 WebAdministration 模組包含哪些 Cmdlet 或 Alias 可用,也可輸入以下指令查詢:
get-command -pssnapin WebAdministration

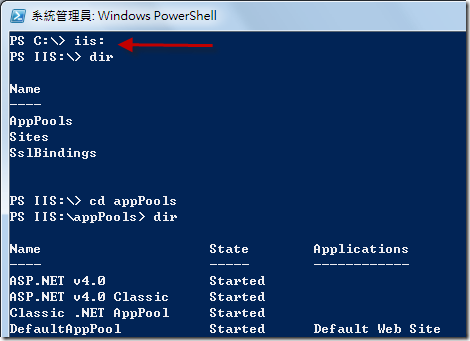
當 WebAdministration 模組匯入之後,就會在你的 PowerShell 環境建立一個 IIS:\ 命名空間,你可以輸入 IIS: 即可進入,並瀏覽 IIS 相關資訊:
最後,我再補充一個建立捷徑的方法:
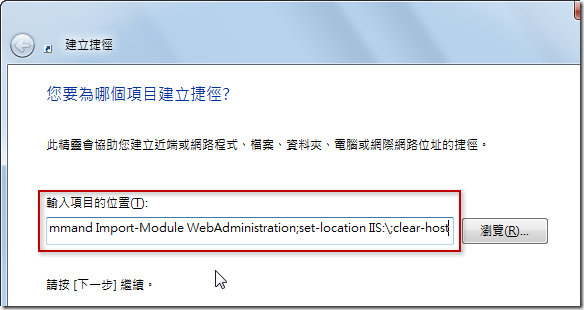
1. 新增捷徑
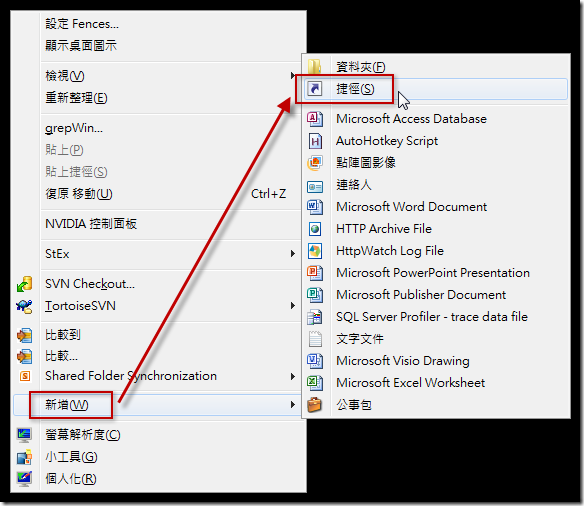
2. 輸入以下指令與參數
C:\Windows\System32\WindowsPowerShell\v1.0\powershell.exe -NoExit -command Import-Module WebAdministration;set-location IIS:\;clear-host
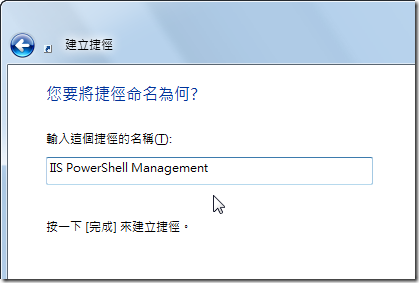
3. 設定捷徑名稱 IIS PowerShell Management
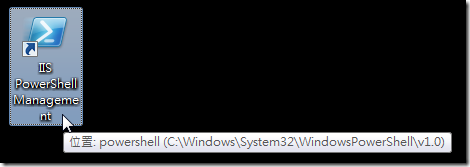
大功告成!
接下來就是要進一步瞭解如何透過 PowerShell 進行站台管理,詳細文章請參考 Using Scripts to Automate Management 頁面的說明。
相關連結